Related Support Center Articles
| Bank Reconciliation |
Overview
A Bank Reconciliation is a period end (or month end) procedure used to 'true-up' the transactions in Restaurant365 to the actual activity that has cleared your Bank Account.
Step 1: Obtain a copy of your bank statement for the account that will be reconciled
We will need the statement end date and ending balance to start the new reconciliation. Click 'Reconciliation' on the 'Banking' menu to open the bank rec.

Only one unapproved bank reconciliation can exist for the same account at a time. If a new reconciliation needs to be created, the unapproved rec would need to be approved or deleted.
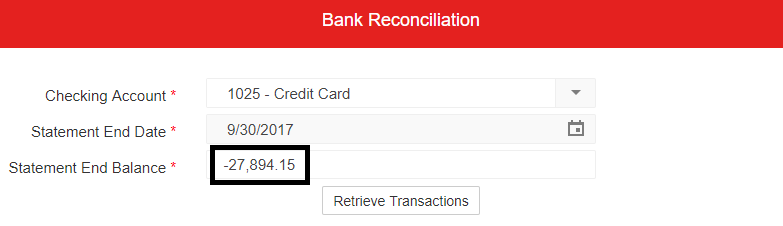
Select the bank account, enter the statement end date and balance, then click 'Retrieve Transactions'. This will load all approved transactions up to the statement end date and begin the reconciliation process. Unapproved transactions will not be included.
Reconciling a Credit Card
If you want to reconcile a Credit Card, ensure that the R365 account has been set up as a Bank Account. This will make the account available to be selected in the account selector. Credit Card transactions will also have to be entered or imported at the detail level.
The only distinction when reconciling a credit card is that the statement end balance must be entered as a negative number. All other steps will be identical.
Step 2: Set Beginning Balance
If this is the first time that you are reconciling this bank account in R365, you'll need to enter the last reconciled date and balance on the Bank Account record. Click here to see these Bank Account fields
Alternatively, you can update the 'Beginning Balance' field on the Bank Rec Screen. Next time you start a bank rec, it will take the prior reconciliation's ending balance to populate this field.

Our goal is to get our 'Cleared Balance' to equal our 'Statement End Balance'. When the difference shown here equals '0', the bank rec is complete.

Step 3: Reconciling
As transactions are checked off on the 'Checks/Withdrawals' and 'Deposits/Other Credits' tabs, the summary balances will update, along with the cleared balance. Each checkbox gets us closer to '0'.
When a transaction has been marked off as 'reconciled' on a saved Bank Rec, that transaction is locked throughout the system and can no longer be edited or deleted, regardless of its approval status. Each reconciled transaction will be marked with an 'R' for reconciled, and will have a link to the Bank Rec where it appears under the approval status. Click here for an example image
The only way to make changes to one of these transactions is to uncheck it on this screen, then re-save the bank rec and make the edits.
If you are taking advantage of the Bank Activity feature, the majority of the transactions should already have been checked off from your matched Bank Activity. For the unchecked transactions that remain, we will review and check them off manually.
Step 4: Locate and Update Missing Transactions
If a transaction from your bank statement isn't showing up on your bank rec, you can easily create a new transaction from this screen. Before you go down this path, you should first double check to make sure the transaction doesn't already exist. Here are a few common scenarios to check first.
- Was the transaction entered, but never approved?
- Was the transaction applied to the wrong bank account?
- Is the post-date on the transaction after the statement end date?
Each of these scenarios would keep a transaction from appearing on the Bank Rec. If you locate a missing transaction, make the necessary changes, then refresh the Bank Rec to proceed with your reconciliation.
Step 5: Adding Transactions
Once you have verified that the transaction doesn't exist, you can create it by clicking either the '+ Add Withdrawals' or '+ Add Deposits' actions. Be sure to exercise caution when creating Withdrawals for vendor payments.

If the invoice has been entered in R365, and you create a withdrawal instead of an AP Payment, the invoice will remain on your AP Aging and will not be marked as paid.
For these situations:
- leave the bank rec
- find the invoice
- use 'pay bill' to create, apply, and approve the AP Payment
- refresh the bank rec to reconcile the new AP Payment
Continue the reconciliation process until the balance reaches zero and our 'Cleared Balance' and 'Statement End Balance' are equal. It's a good idea to save the reconciliation periodically to ensure that no work is lost.
Step 6: Reconciliation Report
At any point after the Bank Rec has been saved, you can run the 'Reconciliation Report' from the 'Action' menu. This report is extremely useful in identifying and grouping each transaction that appears on the bank rec.
The report breaks down the transactions that appear on the reconciliation in to three categories:
- Cleared Checks and Withdrawals
- Cleared Deposits and Other Credits
- Uncleared Transactions
After completing your first bank rec, it is important to verify that the 'Statement Balance + Uncleared' value is equal to the GL Account Balance as of the date on the Reconciliation Report. If these numbers match, then your beginning balance journal entries and unreconciled bank transactions were correctly entered in to R365. Click here to see a sample image explaining this concept
Export the Reconciliation report to PDF, then return to the Bank rec screen.
Upload a copy of the bank statement to the Bank Rec, optionally print a hardcopy the saved Reconciliation Report, and then Approve and close the Bank Rec. The Bank Reconciliation is now complete and you are done until the next period end!