Related Support Center Articles
| POS Integration Settings Overview | POS Integration Settings: Location Record |
Overview
This Lesson will discuss the POS Integration settings found on the Location Record. Along with the System Preferences Settings, updating these settings prior to working with the POS Team will significantly speed up your POS integration.
Navigate to the 'Administration' subsection of the Accounting Module, and select the 'Locations' list. Open a Location record to begin

General Tab
On the General tab of the Location Record, the POS Import Type is set, making the other POS Integration related tabs visible
POS Import Type - This field is where we will set if we will import Sales, or Sales and Labor for this Location. The three options include:
- None - default setting. No POS Integration will be set up for this Location
- Sales - Daily Sales information will be imported for this Location. Labor data will not be imported. When selected the 'POS Integration Settings' tab becomes visible
- Sales and Labor - Daily Sales and Labor information will be imported for this Location. When selected the 'Labor Estimates', 'POS Integration Settings', and 'Breaks & Split' tabs become visible
Update any of the other fields on the General tab as needed, then continue

Default Accounts Tab
On the Default Accounts tab we must set the Default Checking, Over/Short, Deposit, and Credit Expected Accounts for this Location. These selections are important as they are used throughout R365 to save time by auto-setting these accounts when applicable.
- Checking Account - this will auto-set the checking account when paying invoices for this Location
- Deposit Account (Undeposited Funds) - If you plan on using the Bank Activity feature, selecting the Undeposited Funds Account will allow you to make adjustments to cash deposits, as well as group multiple R365 deposits to match into a single Bank deposit
- Over/Short Account - Only P&L Accounts (Accounts with a GL Type that resides on the P&L) can be selected here
- Credit Expected Account - Credits due can be tracked in R365. This will be the Account where those credits will reside for this Location

Labor Estimates Tab
On the Labor Estimates tab, Accrued Payroll, Manager Payroll, Payroll Tax, Benefit, and Other Estimates are set for the Location. These fields are not required for importing labor details, but must be setup to view Fully Burdened Labor estimates in the Scheduling module as well as on the DSS Labor Journal Entry.
Please refer to the detailed field descriptions below, or find more information in the Related Articles section
- Accrued Payroll Account - Select the Accrued Payroll Account here. Restaurant365 can keep track of the daily labor costs (when utilizing a POS system where Labor is tracked) and post a daily labor accrual to this specified account
- Daily Manager Salary - R365 can account for the Daily Manager Salary expense via a static amount entered as a number value in this field.
- For example: if the salaried management labor expense for the week is $1000, you would divide that amount by the number of days you are open during the week (7 in this example). $1000 / 7 = $143.00. $143 would then be entered as the Daily Manager Salary.
- Alternatively, the annual salary for the salaried management expense can be divided by 365 to capture the Daily Manager Salary ($52,195/365 = $143.00)
- Manager Payroll Account - Select the Manager Payroll Account in which the Daily Manager Salary will be recorded
- Payroll Tax % Estimate - Enter the Payroll Tax Percent Estimate (as a percent of Labor) for this location here (8% = 8)
- Payroll Tax Estimate Account - Select the Payroll Tax Estimate Account in which the Payroll Tax % Estimate will be recorded
- Payroll Benefit % Estimate - Enter the Payroll Benefit Percent Estimate (as a percent of Labor) for this location here (2.5% = 2.5)
- Payroll Benefit Estimate Account - Select the Payroll Benefit Estimate Account in which the Payroll Benefit % Estimate will be recorded
- Payroll Other % Estimate - Enter the Payroll Other Percent Estimate (as a percent of Labor) for this location here (1.5% = 1.5). This is commonly used for Worker's Compensation
- Payroll Other Estimate Account - Select the Payroll Other Estimate Account in which the Payroll Other % Estimate will be recorded

POS Integration Settings Tab
On the POS Integration Settings tab, additional POS settings such as Petty Cash in Daily Close, Pay Tips with Payroll and Overtime Tracking values are set.
- POS System - choose the POS System type for this Location from the list
- POS Import Start - Select the Date that the POS system will start importing DSS files at this Location. The date in this field is important as the R365 Operations Import Tool will import DSS files starting on this date. Discuss the availability of POS data with your Setup Coach as some POS Systems have limited data retention
- POS Group - if you have created a POS Group, the POS Group selector will be visible below the POS Import Start field. Select the POS Group for this Location

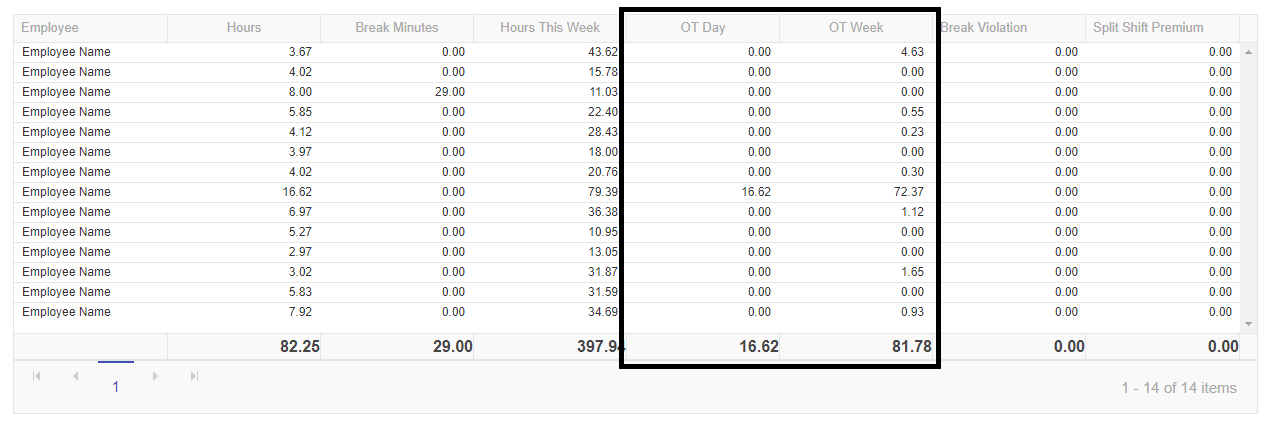
- Overtime Tracking - The selection made here will determine how OT values are calculated and displayed on the Labor tab of the DSS. Select one of the following three options:
- Tracked in POS - any OT Calculations will occur on the POS and OT Values will be imported after they have been calculated on the POS. R365 will not perform any OT calculations. Note: If using Aloha POS, select this option.
- Over 40 hrs/wk - R365 will calculate OT values based on a 40 Hour Work Week. Any hours recorded over 40 total hours for the week will be identified as OT. > 40 for the week = OT
- Over 8 hrs/day and 40/wk - R365 will calculat OT values based on a 40 Hour Work Week and an 8 Hour Work Day. > 40 for the week = OT, >8 for the day = OT. For States, such as California, that specify OT as more than 8 hours per day, select this option.
- Click here to see a sample Labor listing with posted OT values

Paying Tips
These last fields are used to determine how Tips will be paid to your Employees at this Location. The two options include:

- Paying tips with cash at the end of each night
- Paying tips with payroll
For option one, check 'Petty Cash In Daily Close'

- this option will add the 'To Petty Cash' and 'From Petty Cash' fields on the Deposit tab in the DSS for this Location. Any values entered in these fields will be recorded as debits or credits to the account selected in the 'Petty Cash Account' field.
- click here to see the DSS without Petty Cash Fields, and click here to see the DSS with Petty Cash Fields
- Typically, organizations that use Petty Cash in Daily Close are paying out non-cash tips (or credit card tips) in excess of their cash receipts for the day. The remaining non-cash tips are then funded From Petty Cash, depleting the Petty Cash balance. If the cash receipts for the day were sufficient to cover non-cash tips, the excess cash could be deposited To Petty Cash, increasing the Petty Cash balance.
- If this setting is changed after the POS Integration, any DSS file that has previously been imported will not have the 'To Petty Cash' or 'From Petty Cash' fields. To add these fields, the DSS will need to be re-imported.
For option two, check 'Pay Tips with Payroll'

- this option will create a line on the DSS Journal Entry where tips are recorded as a liability to the Account selected in the 'Tips Payable Account' field. When entering a Payroll Journal Entry, tips can then be disbursed.
- click here to see a sample DSS Journal Entry with the Payroll Line included
Day Parts Tab
Each Location can have separate and distinct Day Parts for reporting purposes. Create and manage Day Parts on the Day Parts tab. Day Parts also allow your Users to enter comments in by Day Part on the Comment tab of the DSS or in various places in the Manager Log.
Click here to see Day Part comment entry on the DSS Comments tab, and here to see Day Part Comment entry in the Manager Log
- Day Part Name - Enter the Day Part Name as it will be displayed throughout R365
- Day Part Start Time - Enter the Day Part Start Time (End Time will be determined by the next Day Part Start Time)
- Day Part Avg Check Goal - optionally enter the Avg Check Goal for this Day Part

Breaks & Split Tab
Labor Breaks and Split Shifts can be tracked differently for each Location on the Breaks & Split tab. You can review this tab and update the setting prior to your POS integration, however it may be preferable to review these settings after the integration is complete and you can review how the Labor data is being imported into R365. Refer to the related articles section for more information on Breaks and Splits

Next Steps
Now that your pre-integration settings are in place, you are ready to proceed with the POS Integration. Reach out to your Setup coach to get started. Once the integration is complete, and DSSs have started to import, you can proceed to the next Course to complete your POS Account Mapping.